A pole barn uses poles in the ground instead of a traditional foundation, which can cut construction costs dramatically. You can buy complete metal barn kits or DIY barn kits or build your own using small barn plans. You may find that it is cheaper to buy the materials separately and assemble the barn that way. You can then use that structure like a garage, shed, traditional barn or even convert it into a home.
Prepare the Ground and Stake the Building
Video of the Day
The cheapest way to build a pole barn home is to save money on labor by doing it yourself. Begin clearing the land of debris, including sticks and rocks. For the ultimate in cost savings, do this using a shovel or tools you already have. You can also rent land-clearing materials for a low day rate from a local home improvement store. Finally, level the ground.
Video of the Day
Then refer to your barn building plans to carefully mark out corners and walls of the pole barn using stakes and twine, which costs just $3.50 for 109 feet at the Home Depot. To save on costs further, save the twine when you are done. You'll need to use stakes along the perimeter and in the center of the planned structure, where the poles will go for larger installations.
Set your corner poles. Once again, the depth you need to bury them depends on the size of the building. They'll need to be four feet or more into the ground. Dig holes with a shovel, and insert the poles. Hold the bars steady while pouring concrete around them and let it dry and harden.
Consider also: How to Sell Old Barns
Frame Your Barn According to Simple Pole Barn Plans
Nail skirt boards around the bottom edges of the poles, ensuring they are perfectly even. If you choose, you can add skirt board protectors, which cost $105.83 for a pack of six that are 5 inches x 1.625 inches x 99 inches.
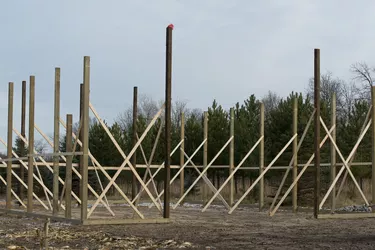
Then, begin building the walls. In most cases, for walled structures, you'll use 2x4s to brace the poles or as framing. Then, complete the walls using whatever materials you've selected. You may utilize metal sheets, wood or other materials. Wood is likely to be less expensive; as of this writing, 2x4s from the Home Depot cost just $7.48 for an 8-foot section.
While some of this process isn't easy, the labor cost to build a pole barn is one of the most significant expenses, and you're keeping that money in your pocket by choosing to DIY the project.
Consider also: How to Build Cheap Horse Barns
How to Build a Pole Barn House Cheap: Build the Roof
Now that you've assembled your walls, you can add the roof. How you go about this step depends on the size and type of structure you're building. Even open-walled structures should have roofs to provide shade or protection for the items inside.
Set up beams and then use prebuilt roof trusses on top of them. Alternatively, nail cross-beams and cross-members between side posts and the center posts. Then add roof supports from the high center support to the side posts. You can use lumber for the trusses and beams. Trusses specifically identified as such cost about $160 for a piece that is 3-1/2 in. x 7 in. x 8 ft., according to the Home Depot.
Finally, you need to cover the roof. You can use metal sheets, plywood or other materials. Plywood is likely to be the most cost-effective, at just $45.95 for a 7/16 in. panel that is 4 ft. x 8 ft. You can also build a traditional roof on top of this layer, though you'll need to plan for the extra weight on the posts and supports.
Consider also: Can You Depreciate a Barn?
Finish With the Floors
The final step is building the floors. If you're going to use the barn for livestock, as an indoor riding arena or for another similar purpose, you may not need to pour concrete.
If you do, though, use 2x4 lumber staked in place around the perimeter of the barn's ground, and then use mesh wire or something similar to reinforce them. Pour the concrete on top and ensure that it dries smoothly. Do not walk or drive on it for at least 48 hours.
Ultimately, the cost of your barn will depend on the specific plans you choose, whether you already own most of the tools required to build the barn and the materials you decide to use for the structure.